Cylinder disassembly
1. It is important to have a clean work space to service the cylinder.
2. Remove all plugs and ensure that the cylinder is free of any hydraulic pressure.
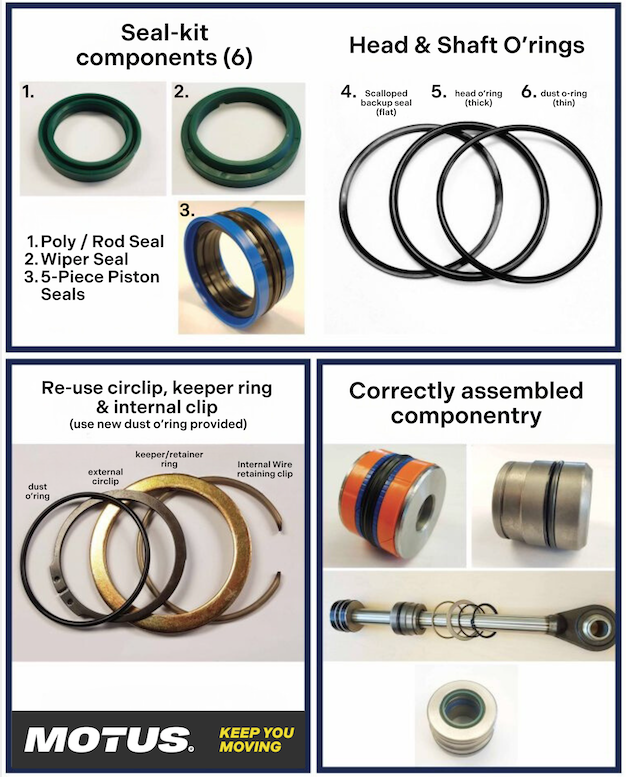
3. Using your circlip pliers, remove the external circlip and retainer/keeper ring.
4. Using your flathead screwdriver pluck out the dust o’ring.
5. Tap the head/gland back 15-20mm using a small piece of plastic leaving you a clean shot at the internal clip.
6. Find the separation gap on the internal clip and using your flat head screwdriver maneuver it behind the clip groove gap and flicking it toward the tube and, releasing it from its groove.
7. Pull backwards (quick hard pull) the shaft assembly releasing it from the barrel.
8. Analyse the shaft and tube for any damage.
9. Lock the shaft into the vice being careful not to damage the chrome shaft.
10. Remove all outside seals and push the head as far away from the piston as possible.
11. With the gas torch slowly heat the bottom end of the piston in a circular motion for 1.5-2 minutes until you see a small puff of smoke coming off.
12. Adjust your stilson wrench tightly onto the piston and turn in an anticlockwise motion.
13. Remove the piston from the shaft thread making sure any debris on the thread is removed and clean for re-assembly.
14. Remove the head/gland, pay attention to its direction/orientation on the shaft.
15. With your flathead screw driver remove the rod/poly seal and wiper seal paying particular attention to which way the rod seal was positioned in the head groove.
16. Once all seals are removed, thoroughly clean all the parts removing any leftover debris.
Cylinder re-assembly
17. Reassemble new seals in the head making sure that the rod seal is placed correctly (open side facing up toward the bottom of the head), also the backup seal is slightly scalloped to house the backup o’ring and must be positioned facing upward.
18. Place clips and o-ring back on the shaft in this order – external circlip, keeper ring, dust o’ring, internal wire clip.
19. Lightly oil the internal head seals and place the head back on the shaft in the correct direction.
20. Coat the shaft thread in Loctite and spin on the piton locking it to the face of the shaft as tightly as possible. (allow 5 minutes for it to set).
21. Re-apply piston seals, the centre pressure seal you will need to lever over the piston with the flathead screwdriver.
22. Lightly coat all surfaces with oil, the head and tube contacting surfaces should be lightly greased.
23. Insert the shaft assembly back into the tube, tap the head in using a small piece of wood or plastic allowing you enough room to re-insert the internal wire clip.
24. Pull the shaft assembly backwards which will seat the head/gland into its groove.
25. Re-apply dust o’ring, keeper ring and external circlip.
26. Cylinder is complemented, test under hydraulics for any leaks.
